 Wuxh · 吴小红
装饰者模式之AOP实现"中间件模式"
装饰者模式的定义: 在不改变对象自身的基础上, 在程序运行期间给对象动态地添加方法.
AOP
在前端, 可以通过 before 和 after 函数来实现:
Function.prototype.before = function (fn) {
  // 函数处理前执行fn
  var self = this;
  return function () {
    fn.call(this);
    self.apply(this, arguments);
  };
};Function.prototype.after = function (fn) {
// 函数处理后执行fn
var self = this;
return function () {
self.apply(this, arguments);
fn.call(this);
};
};实现思路是对被处理的函数通过闭包封装在新的函数里, 在新的函数内部按照顺序执行传入的参数 fn 和被处理的函数。
举个栗子: 用户提交表单数据之前需要用户行为统计, 代码应该是这样写:
function report() {
  console.log('上报数据');
}
function submit() {
  console.log('提交数据');
}
submit.before(report)(); // 提交之前执行提交报告
// 执行结果: 上报数据  => 提交数据

// 等同于
report.after(submit)(); // 提交报告后执行数据提交
// 执行结果: 上报数据 => 提交数据
从代码可以看出已经把统计和数据提交业务隔离起来, 互不影响。
但是如果提交数据之前, 需要数据验证并且依据验证结果判断是否能提交,这里要改动 before 函数:
Function.prototype.before = function (fn) {
  var self = this;
  return function () {
    // 函数处理后执行fn
    var res = fn.call(this);
    if (res) self.apply(this, arguments); // 返回成功则执行函数
  };
};
function report() {
console.log('上报数据');
return true;
}
function validate() {
console.log('验证不通过');
return false;
}
function submit() {
console.log('提交数据');
}
submit.before(report).before(validate)();
// 执行结果: 验证不通过function report() {
console.log('上报数据');
return true;
}
function validate() {
console.log('验证通过');
return true;
}
function submit() {
console.log('提交数据');
}
submit.before(report).before(validate)();
// 执行结果: 验证通过 => 上报数据 => 提交数据AOP 思想在前端分解隔离业务已经做到位了, 但是却有了一串长长的链式出来, 如果处理不当很容易让维护者看晕;
例如下面这样:
// 提交数据前, 验证数据, 然后上报, 在提交之后做返回首页的跳转
function report() {
  console.log('上报数据');
  return true;
}
function validate() {
  console.log('验证通过');
  return true;
}
function submit() {
  console.log('提交数据');
}
function goTo() {
  console.log('返回首页');
}
submit.before(report).before(validate).after(goTo)();
// 执行结果: 验证通过 => 上报数据 => 提交数据
express 与 koa 的中间件
express 和 koa 本身都是非常轻量的框架, express 是集合路由和其他几个中间件合成的 web 开发框架.
koa 是express 原班人马重新打造一个更轻量的框架, 所以 koa 已经被剥离所有中间件, 甚至连 router 中间件也被抽离出来, 任由用户自行添加第三方中间件。
express 和 koa 中间件原理一样, 直接就抽 express 来说:
var express = require('express');
var app = express();

app.use(function (req, res, next) {
  console.log('数据统计');
  next(); // 执行权利传递给
});

app.use(function (req, res, next) {
  console.log('日志统计');
  next(); // 执行权利传递给
});

app.get('/', function (req, res, next) {
  res.send('Hello World!');
});

app.listen(3000);
// 整个请求处理过程就是先数据统计、日志统计, 最后返回一个Hello World!
上图运作流程图如下: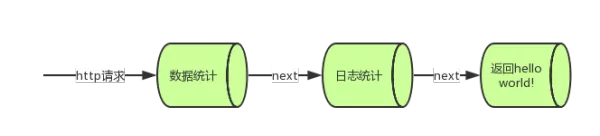
从上图来看, 每一个管道都是一个中间件, 每个中间件通过next方法传递执行权给下一个中间件, express 就是一个收集并调用各种中间件的容器。
中间件就是一个函数, 通过 express 的 use 方法接收中间件, 每个中间件有 express 传入的 req, res 和 next 参数。
如果要把请求传递给下一个中间件必须使用 next() 方法。当调用 res.send 方法则此次请求结束, node 直接返回请求给客户, 但是若在 res.send 方法之后调用 next 方法, 整个中间件链式调用还会往下执行, 因为当前 hello world 所处的函数也是一块中间件, 而 res.send 只是一个方法用于返回请求。
借用中间件
我们可以借用中间件思想来分解我们的前端业务逻辑, 通过next方法层层传递给下一个业务。
做到这几点首先必须有个管理中间件的对象, 我们先创建一个名为 Middleware 的对象:
function Middleware() {
  this.cache = [];
}Middleware通过数组缓存中间件。下面是next和use方法:
Middleware.prototype.use = function (fn) {
  if (typeof fn !== 'function') {
    throw 'middleware must be a function';
  }
  this.cache.push(fn);
  return this;
};

Middleware.prototype.next = function (fn) {
  if (this.middlewares && this.middlewares.length > 0) {
    var ware = this.middlewares.shift();
    ware.call(this, this.next.bind(this));
  }
};
// 执行请求
Middleware.prototype.handleRequest = function () {
  // 复制
  this.middlewares = this.cache.map(function (fn) {
    return fn;
  });
  this.next();
};我们用Middleware简单使用一下:
var middleware = new Middleware();
middleware
  .use(function (next) {
    console.log(1);
    next();
  })
  .use(function (next) {
    console.log(2);
    next();
  })
  .use(function (next) {
    console.log(3);
    // next();
  })
  .use(function (next) {
    console.log(4);
    next();
  });
middleware.handleRequest();
// 执行结果: 1 => 2 => 3
4 没有出来是因为上一层中间件没有调用next方法;
升级一下 Middleware 高级使用:
middleware
  .use(function (next) {
    console.log(1);
    next();
    console.log('1结束');
  })
  .use(function (next) {
    console.log(2);
    next();
    console.log('2结束');
  })
  .use(function (next) {
    console.log(3);
    next();
    console.log('3结束');
  });
// 输出结果: 1 => 2 => 3 => 3结束 => 2结束 => 1结束
上面代码的流程图:
可以看出: 每一个中间件执行权利传递给下一个中间件并等待其结束以后又回到当前并做别的事情, 方法非常巧妙, 有这特性我们可以玩转中间件。
实际应用
/**
 * @param data 验证的数据
 * @param next 下一个步骤方法
 */
function validate(data, next) {
  console.log('validate', data); // 验证
  next(); // 通过验证
}

/**
 * @param data 发送的数据
 * @param next 下一个步骤方法
 */
function send(data, next) {
  setTimeout(function () {
    // 模拟异步
    console.log('send', data); // 已发送数据
    next();
  }, 1000);
}
function goTo(url, next) {
  console.log('goTo', url); // 跳转
}
validate 和 send 函数都需要数据参数, 目前 Middleware 只传 next, 需要传递 data 数据才能顺利执行下去, 然而每个中间件需要的数据不一定都一致 (就像 goTo 与 validate、send )。
我们需要引入一个 options 对象来包裹这一串逻辑需要的数据, 每个中间件在 options 内提取自己所需的数据, 这样就能满足所有中间件, 函数做相应调整;
function Middleware() {
  this.cache = [];
  this.options = null; // 缓存options
}

Middleware.prototype.use = function (fn) {
  if (typeof fn !== 'function') {
    throw 'middleware must be a function';
  }
  this.cache.push(fn);
  return this;
};

Middleware.prototype.next = function (fn) {
  if (this.middlewares && this.middlewares.length > 0) {
    var ware = this.middlewares.shift();
    ware.call(this, this.options, this.next.bind(this)); // 传入options与next
  }
};
/**
 * @param options 数据的入口
 * @param next 下一个步骤方法
 */
Middleware.prototype.handleRequest = function (options) {
  this.middlewares = this.cache.map(function (fn) {
    return fn;
  });
  this.options = options; // 缓存数据
  this.next();
};
业务逻辑做相应修改:
function validate(options, next) {
  console.log('validate', options.data);
  next(); // 通过验证
}
function send(options, next) {
  setTimeout(function () {
    //模拟异步
    console.log('send', options.data);
    options.url = 'www.baidu.com'; // 设置跳转的url
    next();
  }, 3000);
}
function goTo(options) {
  console.log('goTo', options.url);
}

var submitForm = new Middleware();
submitForm.use(validate).use(send).use(goTo);
submitForm.handleRequest({ data: { name: 'xiaoxiong', age: 20 } });
// 执行结果:
// validate Object {name: "xiaoxiong", age: 20}
// send Object {name: "xiaoxiong", age: 20}
// goTo www.baidu.com

submitForm.handleRequest({ data: { name: 'xiaohong', age: 21 } }); //触发第二次, 改变数据内容

// 执行结果:
// validate Object {name: "xiaohong", age: 21}
// send Object {name: "xiaohong", age: 21}
// goTo www.baidu.com
以上代码大功告成。
总结
通过以上代码, 实现了业务隔离, 满足每个业务所需的数据, 又能很好控制业务下发执行的权利, 所以 中间件 模式算是一种不错的设计。
从代码阅读和代码编写的角度来说难度并不大, 只要维护人员拥有该方面的知识, 问题就不大了。
参考文档
CC BY-NC-SA 4.0 2018–PRESENT © Xiaohong Wu